
I’m sure you have seen these no-snag hair ties at stores like Anthropologie, Sephora and Claire’s. They are great because they won’t cause breakage to your hair or leave big dents in your hair like regular hair rubber bands. They are made of fold over elastic, which is gentle to the hair and this type of elastic comes in so many fun colors, prints, and textures. I saw some of these hair ties at my local bookstore the other day for $11 for a 4-pack. It costs pennies to make these yourself, plus they are quick and easy to make. You can also attach beads or flowers to jazz them up or just leave them plain. If you scroll down, you can see a hair tie that I made for my daughter with a pretty silver, rhinestone-studded flower attached. They also double as a bracelet until you are ready to put your hair up in a pony. I made this pretty blue set for my good girlfriend and exercise buddy. We go walking together while our kids are at school and I know she will love these for walking and biking. I used the printable template to make a pretty card to hold this set of hair ties, put them in a cellophane bag, tied them with some twine and attached a fun tag.
These hair ties would make great holiday gifts that are both useful and budget-friendly. These also would make great holiday gifts or birthday party favors for teens and tweens. I plan to also make a bunch of these hair ties for myself and for my daughter to use at home. Her hair accessories tend to get lost and so it will be great to have a nice hair tie stash. If you plan to gift these, you can use the free printable template to make a pretty card to attach them too or you can buy some cute, silver tins at the craft store and tie them up with a tag. There is a photo below of some hair ties tucked inside a silver tin and tied up with a pretty tag below. This tutorial also includes 3 different free printable tags in different color schemes for gifting your hair ties. You can download the free files below.
To Pin this project to your Pinterest boards for later, simply scroll over one of the photos and press the “pin-it” button.
Supplies
- 5/8 inch Fold Over Elastic, 9.5 inches per hair tie. (My favorite source for this elastic is Sunshine Shoppe. They have a great a selection and prices!)
- Sewing Scissors
- Lighter (I show a candle in my photo, but a BBQ lighter works best!)
- Ruler
- Large beads or flowers (optional)
- Kneedle and thread (optional)
Supplies for Gifting/Wrapping
- Everyday Savvy Hair Ties Tags
- Everyday Savvy Hair Ties Holder Template
- White Cardstock
- Thick Scrapbooking Cardstock
- Cellophane bags (optional)
- Ribbon or Twine (optional)
- Tin (optional)
If you are making these for yourself or for members of your family then you will just need a few simple supplies from the supply list above, most of which, you might already have. You can find packs of fold over elastic (FOE) at places like Joann Craft and Fabric stores, but one of the cheapest place to get it is online at Sunshine Supply Shoppe or Etsy. FOE comes in many colors and patterns, plus I have seen really pretty glitter and velvet Fold Over Elastic. You can get make about 3.5 hair ties with each yard of FOE. You will also need a ruler for measuring your FOE and some sharp sewing scissors for precise cuts. I use a candle or a lighter to slightly singe the ends of my hair ties so they don’t get frayed.

Fold Over Elastic (FOE) comes in many pretty colors. Search Etsy.com or Sunshine Supply Shoppe to see all of the gorgeous colors, prints and textures. The best size for hair ties is 5/8 inch wide.

Just a few simple supplies to make these at home. Make sure you use sharp fabric and sewing scissors to get clean cuts. You can use either a lighter or candle to slightly singe the ends of your hair ties to prevent fraying.

Measure and cut 9.5 inches of FOE for each hair tie.

Fold your 9.5-inch piece of FOE in half and bring your ends evenly together with the shiny side or “right side” of the FOE facing out

Tie the ends in simple knot, leaving 1/2 to 3/4 of an inch at the ends. Make sure it’s nice and tight.
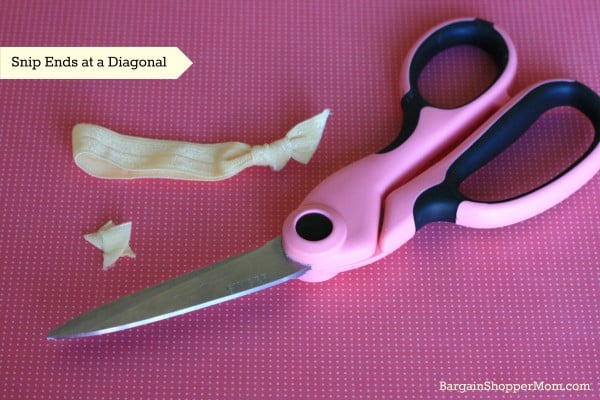
Snip ends at a diagonal with your sharp sewing scissors.

I know I am demonstrating with a candle here, but a BBQ lighter or a regular lighter works best (no soot from the wick!). Run the ends of your hair tie through the flame quickly, once or twice to seal the ends to prevent fraying. It only takes a second or two to seal them. If you are making these for yourself, you are finished! How easy was that?

If you want to put your hair ties onto a holder, print out the Everyday Savvy Hair Tie Holder Template onto white cardstock and cut it out. Use the template to trace onto your thick scrapbooking cardstock. Cut out your holder and slide your hair ties onto the card.
Print out the Everyday Savvy hair tie tags onto white cardstock and cut each one out and punch a hole for the ribbon. Wrap in a cellophane bag and tie with a tag.

These also look great tucked into a cute, silver tin. I found this tin at Michael’s for about $1 and it’s amazing how many hair ties you can fit in one tiny tin.

I found these great rhinestone flower large beads at Michael’s in the bead section. It has holes on the back and I can easily hand stitch it onto the hair tie. They were about $5-6 for two flowers. Don’t forget to use your coupons! If you have a large round bead with a large hole, you will need to loop it through your hair tie before you tie it off.

Sew your large decorative flower or bead onto the hair tie, knot the ends of your thread and trim your thread.

All Finished with this dressed up hair tie. I made this great, high-end hair accessory for just a few bucks! My daughter absolutely loves it.
To pin this project for later, scroll over any photo and press the “pin-it” button.
Templates
Everyday Savvy Hair Ties Holder Template
Subscribe to the News
Like what you see here? Get free printables and tips! Be sure to sign up to get the latest right in your inbox.
Shannon says
Melissa, I love these!!!
Do you use the same length for adults and children? 9.5 inches….is that for both or just for adults. How many inches would use use for a child?
Thanks,
Shannon
Heidi says
Hi Shannon,
You can see my daughter in the last photo. She is newly 10 and petite and I make her the 9.5 inch size. They are a little bit loose on her wrist (when they are not in her hair), but it’s nice to be able to twist them around a few times to hold her thick hair when she is active. I love these too and so we share a whole stash of them. If you want them smaller, you could definitely cut them to 8.5 inches. They stretch out a bit, but still work great in our hair! I use them for buns too and I have already noticed less breakage than with “ouchless” hair rubber bands. 🙂
I hope this helps and let me know if you have more questions!
~Heidi
Theresa @DearCreatives says
Super cute & easy! Come share them at my party I’d love to have you join in. Visiting from #SF
Michelle says
I would like to make these for my 2 y/o granddaughter, how long do you think they should be?
Melissa says
I would say about 1/2 inch to an inch smaller. It will be harder to tie these though. The hair ties stretch with use too. You will probably want to make one and try it out on her head. It depends on how think her hair is as well.
Claire Strauss says
3.5 hair ties is such an odd number and seems like a waste of elastic. What do you do with the leftover few inches, each time?
Melissa says
I usually double it and make 7 hair ties. However, I wanted the directions to show the smallest number.
Sheena says
These are so cute!! I made some for my girls a few years ago but I didn’t think about adding a charm. Thanks for sharing at #HomeMattersParty I hope you will join us again this week!!
Bain says
WOW. Thank you so much for the pointer to the foldover elastic. I’m going to make up a batch of these for a fundraiser.
Melissa says
Hope they work out well for you. They are so easy to make and so inexpensive when you make them yourself.
Jamie says
Those are adorable!! What a great way to match any outfit and save a lot of money! Thank you for sharing with us at the #HomeMattersParty
Heidi says
Thank you!
Sherry says
These are adorable and something my grand daughter would love. Thanks for sharing with us at Merry Monday.
Heidi says
Thank you!
Jessica says
I pinned this! I’ve got three little girls, and at some point, hair ties are going to be the center of our universe. This is going to save us a small fortune.
Allison says
I love this! Thank you for the tutorial!
Heidi says
You are welcome!
Wendi Brown says
What kind of paper did you use? All my paper folds up?
Melissa says
I used a thick cardstock. If you don’t have that you could cut out some cardboard and paste the decorative paper to it.